The HBK 2755 Smart Power Amplifier is suitable for stand-alone use, but DIRAC users can also take advantage of this amplifier in various ways:
Using the amplifier as a stand-alone stimulus generator with power output, without any connection to DIRAC, for asynchronous measurements.
Using the amplifier as a Power Sound Device, connecting DIRAC to the 2755 using a USB cable, for synchronous measurements.
Using the amplifier as a stimulus generator with power output, controlled by DIRAC 7 through a Wi-Fi connection, for asynchronous measurements. Note that HBK 2755-A and DIRAC 6 or earlier have no Wi-Fi option.
Stand-alone stimulus generator (no connection, asynchronous)
DIRAC stimuli can be stored in the HBK 2755 as a User signal, enabling asynchronous measurements.
Because signals can be uploaded to the HBK 2755 through Wi-Fi only, this does not apply to the HBK 2755-A, which is not equipped with Wi-Fi.
You can upload signals from within DIRAC 7, following the procedures described in the section about wireless control of the HBK 2755. It is also possible to upload signals through the amplifier’s web page. Details can be found in the User Manual, Chapter Operation, Section Web Server.
Power Sound Device (USB cable, synchronous)
By connecting the HBK 2755 to a PC through a USB cable, it turns into a sound device with all 2755 input and output options,
e.g. single/dual input, BNC/XLR/TRS input, IEPE/P48/no input powering, balanced/unbalanced input, 0/10/20/30 dB input gain and single/dual output,
(high power bridge)/(medium power SE) output.
After connecting the USB cable, start DIRAC on your laptop, and from the Sound Device Setup menu (Setup > Sound Device…), select core: Line (USB AUDIO CODEC) as the Input device and core: Speakers (USB AUDIO CODEC) as the Output device, then click OK and save the setup under a suitable name.
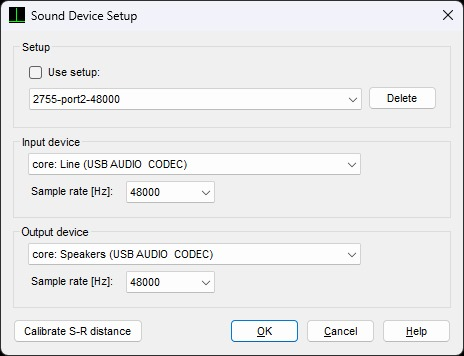
This setup enables synchronous measurements, preserving distance information between source and receiver and maximizing impulse response to noise ratio (INR).
Wi-Fi Control (Wi-Fi connection, asynchronous)
DIRAC 7 can control the HBK 2755 through a Wi-Fi connection. Note that this does not apply to the 2755-A, which is not equipped with Wi-Fi.
Because the Wi-Fi channel is not used for real-time transmission of signals, the measurements are asynchronous,
and the results do not include distance information between source and receiver.
To set up a Wi-Fi connection, you can activate the amplifier’s hotspot mode (menu Network > Wi-Fi mode > Hotspot), and then connect your laptop to this hotspot, using your defined password (Network > Hotspot password). Alternatively, you can connect the amplifier to the same wireless LAN network your device is connected to (Network > Wi-Fi mode > Station).
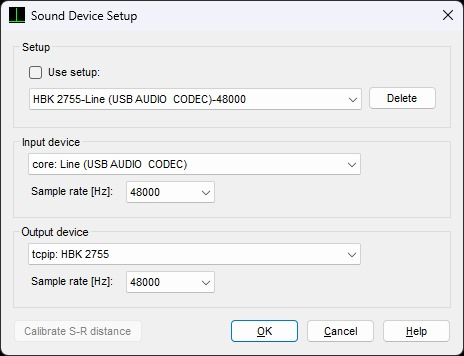
After setting up the Wi-Fi connection, start DIRAC 7 on your laptop, and from the Sound Device Setup menu (Setup > Sound Device…), select an Input device and tcpip: HBK 2755 as the Output device, then click OK and save the setup under a suitable name.
Open the Measurement window and make sure that on the Device tab, the proper sound device setup is selected, and on the Channels tab, the Output is selected.
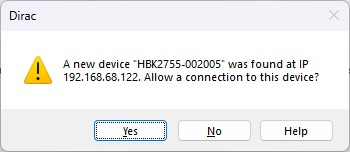
When DIRAC sees a new device on the network, it will prompt you to accept a connection to that device. This will only happen once, and your preference will be stored for future encounters with the same device.
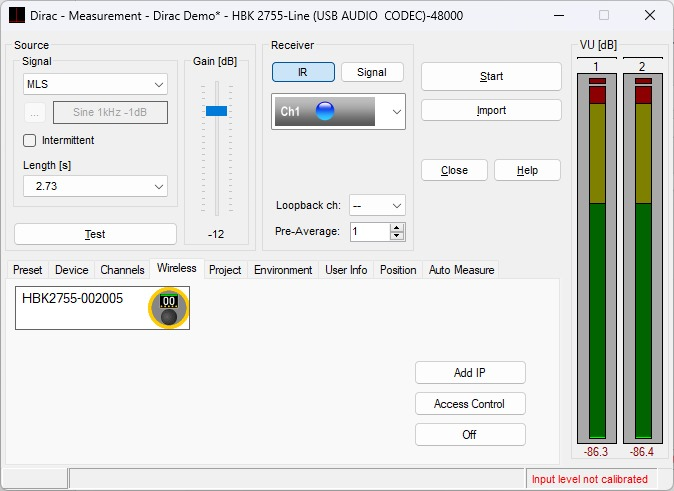
On the Wireless tab, the name HBK 2755 and its serial number should appear. Note that heavy traffic on the Wi-Fi network might impact
the ability of DIRAC to find the amplifier on the network. Should the HBK 2755 not show up after a minute, try turning it off and on again.
Alternatively, you can click the Add IP button and enter the device IP address. Incidentally, this is also the way to connect amplifiers that are not
on the same network as your computer, but can be accessed via a router or VPN.
The HBK 2755 IP address can be found in its menu Network > Info.
Now, a measurement through the amplifier can be done in the usual way in DIRAC. You can for instance select a Source Signal and a Source Gain (which also appears on the amplifier display), and click the Test button. DIRAC 7 will then send a command to the amplifier to play the selected signal. If this signal is new to the amplifier, it will first be transferred to it and stored locally, prior to playing it. The next time the same signal is played, the amplifier will recall it, requiring no transfer anymore.
Note that when playback is active on the HBK2755, the yellow ring around the device icon will turn green
Note that high level signals, such as an MLS stimulus at -6 dB, may overload the amplifier, thereby invoking a warning symbol on the amplifier display, and immediately turning off the signal again. This safety action is not reported to Dirac, which will leave the Test button active without signal present.
All stored signals can be found on the amplifier in the menu User signal, but cannot be deleted there. To delete a stored signal, you have to visit the amplifier’s web page. Details can be found in the User Manual, Chapter Operation, Section Web Server.
Wi-Fi controlling multiple HBK 2755 units
In particular situations it may be convenient to control multiple amplifiers from within DIRAC 7.
To do so, connect each amplifier to the same wireless LAN network your device is connected to,
through their menus (Network > Wi-Fi mode > Station).
In DIRAC 7, the sound device setup and Measurement windows settings should be the same as with a single amplifier, described above, but on the Wireless tab, the names of all HBK 2755 units and their serial numbers should appear. Again, this may take a while, depending on the Wi-Fi network traffic, and may require a power cycle of an amplifier, or a direct entry of an IP address.
Shown below is an example with 2 amplifiers.
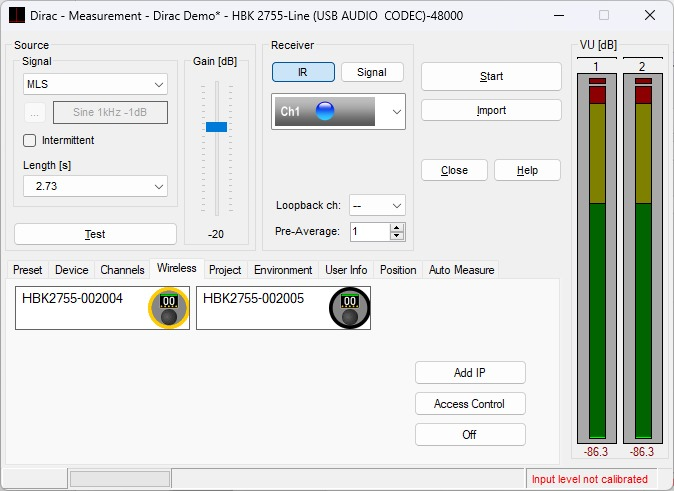
Only one of the units will be active, which is denoted by the yellow rim around the pictogram. A unit is activated by clicking the pictogram, using the left mouse button.
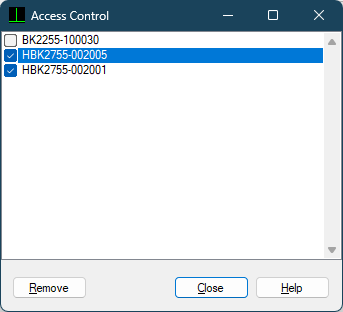
If you want a particular Wi-Fi device not to be used or listed on the Wireless tab,
you can click the Access Control button and uncheck this device. The next time DIRAC encounters this device on the network,
it will be ignored and not added to the list on the Wireless tab. This can for instance prevent DIRAC from inadvertently taking control of your colleague's device.
However, after you check a device in the Access Control dialog, it will be added on the Wireless tab as soon as it is found.
If you Remove a device from the list. DIRAC will treat it as a new unseen device, and will prompt you to accept a connection to it.